Hornbill Platform Quarterly Feature Update 2020 Q3
Despite the unusual year we've had so far, Team Hornbill has been hard at work introducing a series of brand new and exciting Hornbill Platform features.
This summary page highlights a number of these key features, along with a short description of how they may be used, and where you can configure them if you would like to take advantage. We hope you enjoy!
Progressive Capture Workflow
Hide certain site filter options during Progressive Capture
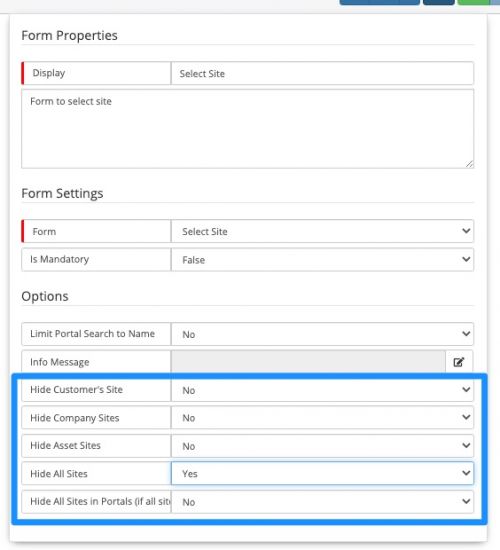
- The Site form in Progressive Capture has had some new options added to it, which will give the administrator more control about which sites are displayed to the Analysts and End Users during a Progressive Capture. Very much like Assets, the site form in the capture provides tabs to allow for advanced filtering including showing only the Customers associated site, the sites associated to the Company the customer is a member of, the sites relating to a previously selected asset, or simply all sites in the system. Now, one or more of these filtering options can also be hidden if you do not want them to appear.
- This functionality is available now, and you can set it up by opening (or adding) a Site form node in a Progressive Capture - the new options will all appear, and have simple "Yes/No" drop-downs associated to provide this granular configuration.
Additional site based filtering added to the Asset selection form in Progressive Capture
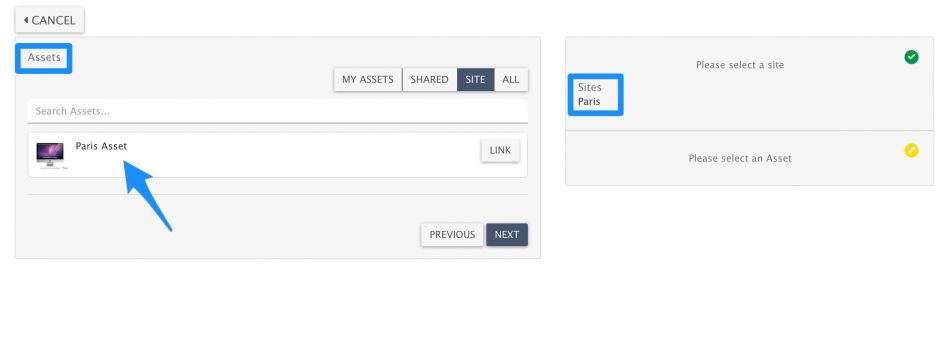
- We've made some improvements to the Asset Progressive Capture form - to not just take into account the customer related to the request, but now also to filter based on the Site that has been selected during the capture so far.
- So for example, a customer is usually based in London (and that is their site against their profile), but is working in Paris for the week. They log a new request and during the capture, they select "Paris" as their current site. When they reach the asset selection form and use the "All assets by site" filter, it will now show assets with a Paris site rather than the usual London based assets. This means that the selection is specific to that particular request.
- This is live now and should be working this way for new and existing captures.
Email Address can be displayed instead of User ID during Customer selection
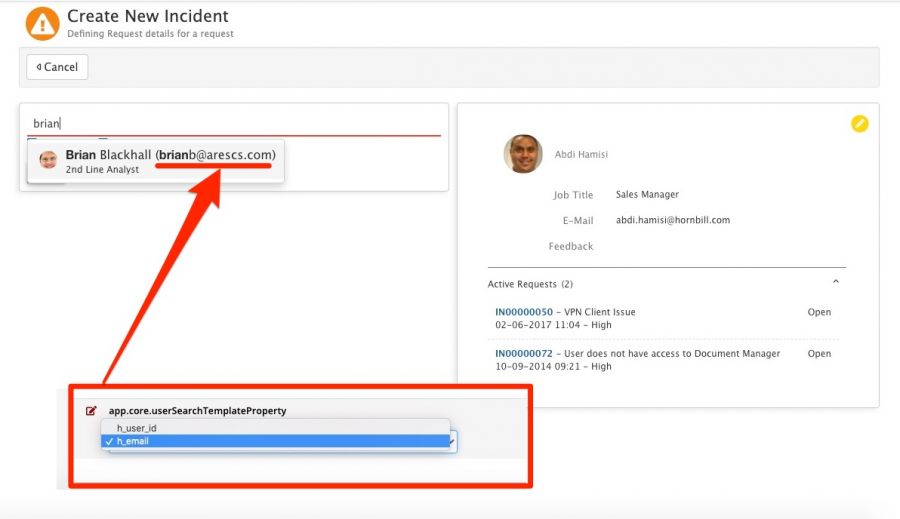
- Previously, the only way of distinguishing between users of the same name during a selection in Hornbill was to look at the User ID in the brackets after their name. Depending on what you use, the User ID can still be difficult to help someone distinguish between these users or possibly even appear unsightly. With this in mind, we have introduced a new system setting that allows you to show the Email Address of a user instead when selecting someone (for example, this could be through the Customer Picker form in Progressive Capture, adding a Connection, when changing the customer on a request, and more - effectively anywhere which involves a customer selection).
- To do this, navigate to the Collaboration Settings (Admin -> Applications -> Collaboration -> Settings) and search for this:
- app.core.userSearchTemplateProperty - and select h_email or h_user_id based on what you would prefer to show
Timesheets
Link Document now has a default timesheet category
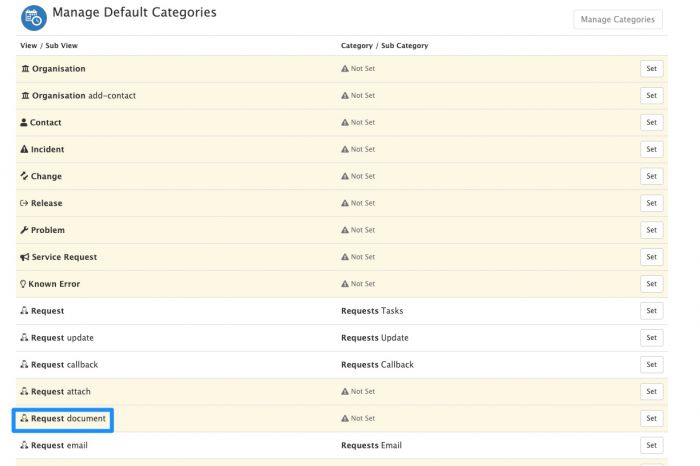
A small enhancement here - if you use Timesheet Manager, you will notice that various Request Action Tabs in Service Manager can have default Timesheet Categories associated to them. Until now, the "Link Document" action tab did not have the option to have a default associated with it. But this has now been introduced in the last quarter, and can be set by accessing Timesheet Manager -> Manage Categories from the Menu Picker in the User App.
Assets
Tags can now be associated to Assets
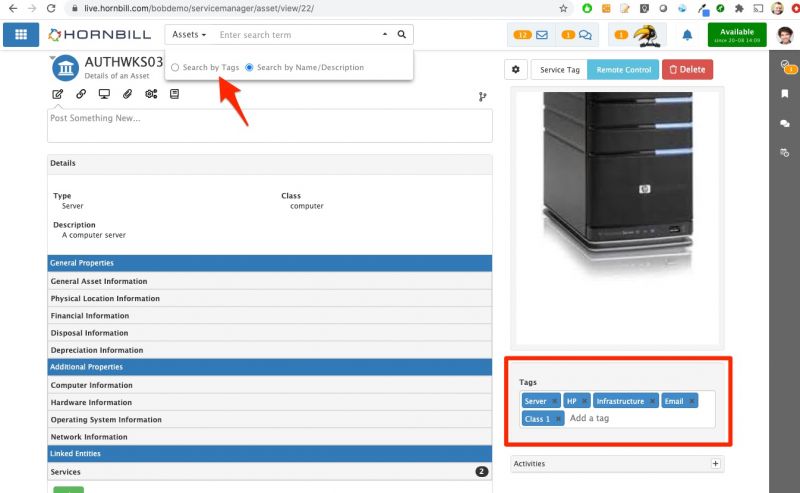
- Tags provide a way to specify keywords or attributes on an Asset, for easy searching for this asset and any other asset using the same tag. Another benefit here is that tags can also be used as part of the criteria if using the Advanced Filter on the Asset List, or creating custom views - so it's a great way to group together Assets by a particular label.
- Search by Name and Description
- Search by Tag
Additional Asset Management attributes added
Over the past quarter, we have had several requests on the Forums for new attributes to be added to a number of Assets classes. We have added a large number of them to a number of our classes including Computer System, Software, Mobile, and General - and they are all available for use immediately. Simply click on "Manage Asset Types" in the user app, locate the new attribute under the class and enable its visibility by checking the box next to its name. More information on Assets can be found on the Assets page.
Admin Tool
Create Users from a Template
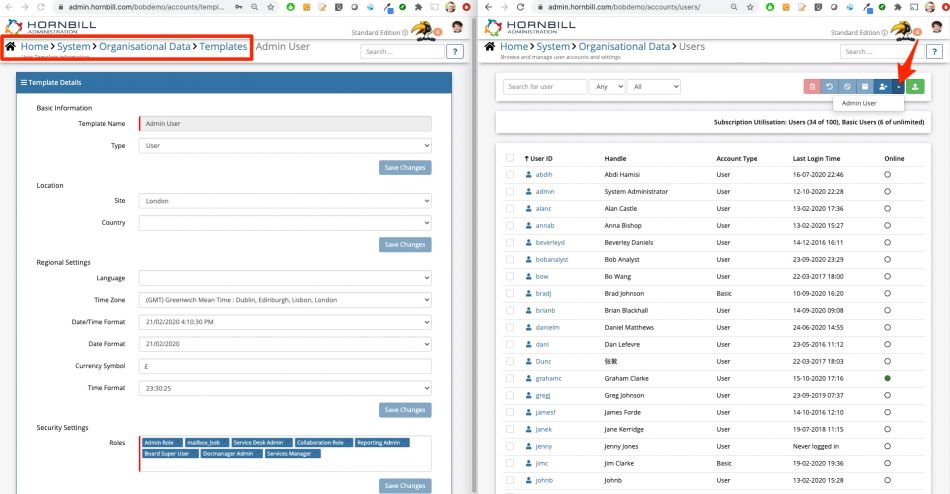
- If you are manually creating Users, especially Analysts, often there may be the scenario where you would like to pre-populate some attributes based on a grouping - or template - of your choice. For example, you may have defined a default set of roles for an Administrator and a different set for a Service Desk Analyst.
- This is now possible with the introduction of User Templates. This functionality will allow you to create templated sets of criteria - for example specifying Type, Site, Regional Settings and of course Roles - so that on the creation of the user, these aspects are pre-populated and you only need to fill in the User-Specific details such as ID, Name and Email.
- To use this functionality, firstly you'll need to create your template. You can find this in the Admin Tool via System --> Organisational Data --> Templates. From here you can create and manage the User Templates.
- Once you have at least one template created, navigate to the Users screen (System --> Organisational Data --> Users) and simply click on the small arrow next to the "Create User" button. This will present your templates in a list - and on selection, the new user form will appear with the desired attributes pre-populated.
For further details on these changes and others check out the Hornbill Wiki

